Configuring AD
PassMan is capable to authenticate a user from an Active Directory, but first we need to set it up. To do that, we have to use the Webmin part of our instance. The Webmin can be reached on the same URL as PassMan, but on the port 10000. You should type something similar into your browser: https://yourpassmanpath.com:10000
Alternatively, instead of the 10000 port, /admin suffix can be used as well.
You will get to the Webmin login page. By default, the login name is manager and the password is the same, manager. We always mention, that it is a good thing and a safety matter to change that password after the first login. (To do that click on the User administration → "Manager" user management in the left hand side tree panel.)
On the left hand side there is a tree panel. Go to PassMan system → Auth configuration. Here all configurations for AD and Local users can be edited.
First menu item is the Local users management. When you click on it an edit window appears. Here (as the description says) simply type the username:password datasets. To separate them use a comma (,). The password will be than encrypted so that is not readable for the human eye.
- AD required groups - the group (in the AD) that will be used in PassMan. If there are more, separate with a comma. (To find out the user's membership to a group, open the Server Manager (type into the search field) and under the Tools menu (top right side of the window), go to ActiveDirectory Users and Computers. At the pop-up window go to Users (left side tree panel), find a user you are looking for and left click on it. From the context menu click on Properties. Another pop-up window will appear, then click on Member of tab. You should get a list of all groups with all the groups the user has a membership to.)
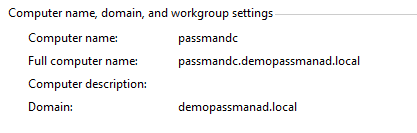
- AD base dn - simply said, it is the domain name separated into two. For example, we have a computer whose domain is called company.local. In this case the AD base dn should look like this: dc=company,dc=local. To find the computer name, right click on This PC and select Properties. In the pop-up window there is a section called Computer name, domain and workgroup settings.
- AD server - it is the IP address of your server with a prefix of ldap://. To find your IP address, type in the search line "Command Prompt" and open the application. Here, simply type IPCONFIG (non case sensitive) and under IPv4 Address you will find the IP that you need. So if the IP address looks like this: 123.456.789.123 than in this section you would insert ldap://123.456.789.123
- AD valid names - is the computer's full name found under Computer name, domain and workgroup settings (see under the AD base dn section).
- AD used groups - the groups we would like to use for authentication or accessing PassMan. If we want all groups to access it just type Domain*.
- AD Technical User username and AD Technical User password - a specific user that can access the AD. We introduced this so-called Technical user because PassMan needs a username/password dataset to brows the AD. This is absolutely crucial for setting permissions. If PassMan can access the AD than it can return a users list which the Administrator can use to restrict or grant access inside PassMan. We suggest using this Technical user for this purpose only. The same time this Technical user should have the lowest privileges in the AD.
- Auth configuration - basically opens the file that has been created using the information typed in above. This is a .json file format. It is a specific format that PassMan will read at every start-up. We suggest not to edit that file unless you are familiar with its format and have an extended knowledge about the information stored in it.
IMPORTANT!
The last button on the page is Restart PassMan service (to apply all changes). It is very important to click on it after editing any part of this page. Otherwise, the changes will not be saved and PassMan will not be able to use those.